Author Archives: admin

Unity 4.3 iOS 2D Tutorial – Camera Projection


Unity Camera Project

Creating a 2D game in Unity 4.3 has become much easier then how it was in past versions.  Basic settings are set up automatically now, sprites are implemented and a whole lot more.  One important aspect of 2D games is using the orthographic projection instead of the perspective one.  This is already done for you when following the steps in the Creating a Unity 2D Project tutorial. From here on, we will go into depth about camera sizes and how it defines the dimensions of the viewport.

Camera Size

Unity 4 Camera SettingsUnity does a “Pixel by Unit” scaling.  By default Unity sets it at 100.  This means that per 100 pixels of a sprite image it is considered 1 unit in Unity.  So if you have an image that is 200×100 pixels Unity would say it’s 2×1 unit.

This is important when adjusting the viewport size for the iOS.  If the resolution of the iPhone is 640×320 you will want to adjust this accordingly.

Lets use an example of having a background image that’s 640 pixels tall with a unit ratio of 100.  To figure out  what size our orthographic camera should have we need to do some basic math.

We will start with 640 / 100 to figure out how many units tall the background image is.  640 / 100 = 6.4.   So far so good, but the orthographic camera’s Size property measures half the heigh of the screen which means the 6.4 units tall will be cut in half to 3.2.

If you change the Size property in the Camera Inspector that’s shown on the right, then the image should fit perfectly in the viewport.


Conclusion

Creating a 2D game in Unity 4.3 has become much easier with less hassle.  There are however some adjustments that need to be made when it comes to iOS.  Camera settings such as the Size property is very important when trying to fit all of your game assets in such a small screen.  Make the proper adjustments based on the “Pixel by Unit” property on your sprites and you should be set!
Unity iOS Tutorial – Getting Started

Getting Started

There are quite a few Unity iOS tutorials out there that claim they explain how to create a game in Unity for the iOS, but I’m going to take it a step further and include settings and options that should be taken care of so you don’t run into issues when building it for a device for testing purposes.  These are the issues I had when first starting to learn Unity.  If you haven’t already, check out our post on Creating a Unity 2D Project before proceeding since our examples will be 2D focused, however what I will be demonstrating in this tutorial will work for 3D projects as well.

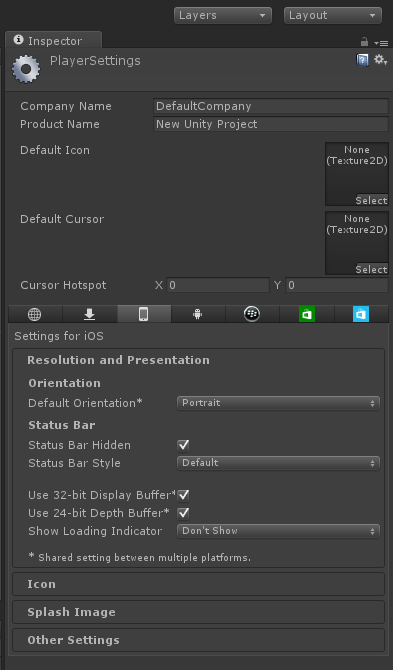
Unity 4 Player Settings

Unity iOS Tutorial Player Settings
To get to the player settings it’s under Edit->Project Settings->Player.

The first two settings are Company Name and Product Name.  I’ve developed for the iOS natively and when settings these options I never included spaces.  For example, if my company name was Game Studios LLC I would shorten it to GamesStudios.

Product Name is more like title of the game when it comes to game development and I also excluded all spaces.  An example for this would be having a game called Super Cool Game I would put supercoolgame as the product name.

I do it this way because when you create profiles to test for you apple device in XCode, Apple requires you to have unique IDs for each game and they are in the form of “com.companyname.product”.  If you want more understand here is an App Distribution Guide by Apple.

Once that is setup you can focus on the bottom half of the Player Settings.  Make sure the iPhone panel is select and it looks like the screenshot on the left.

Depending on the style of game you are making the “Default Orientation” should be set in the position you want your game to start in.  For my first 2D game tutorial I’ll be doing a simple match 3 game so I’ll be leaving it as portrait.

The rest isn’t as important these settings are since they will be used during testing, while the others are more of finishing touches to the game for when it will be released.

Conclusion

With all of the Unity iOS tutorials out there I haven’t seen one that goes into details on setting up the Provisioning Profiles under the Player Settings for iOS development.  These settings are very important when it comes to testing on your iPhone or iPad because the product name has to be unique and leaving it as New Unity Project can cause chaos under XCode.

Creating a Unity 2D Project

This is going to be a simple tutorial on how to create a Unity 2D Project. If you haven’t installed Unity already check out Using Unity 4 for Making a Video Game.  Right now I’m going to run through the basics of creating a Unity 2D Project with some great screenshots.

Unity 2D Project Name

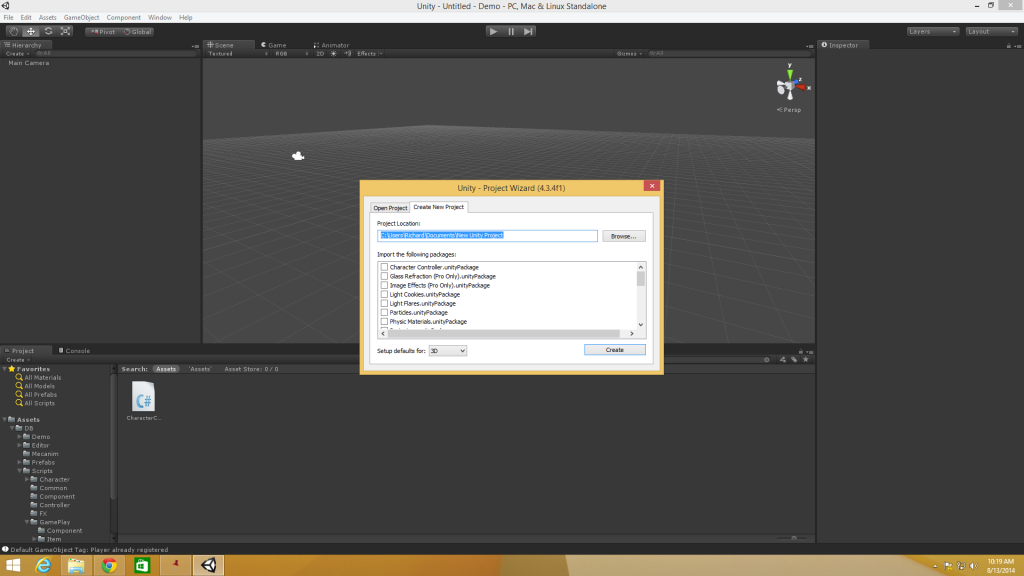
First thing that needs to get done is giving your project name.  In this instance I chose the standard “New Unity Project” for this tutorials purpose.  Name it whatever you want and choose an appropriate directory.


Unity 2D Project Name


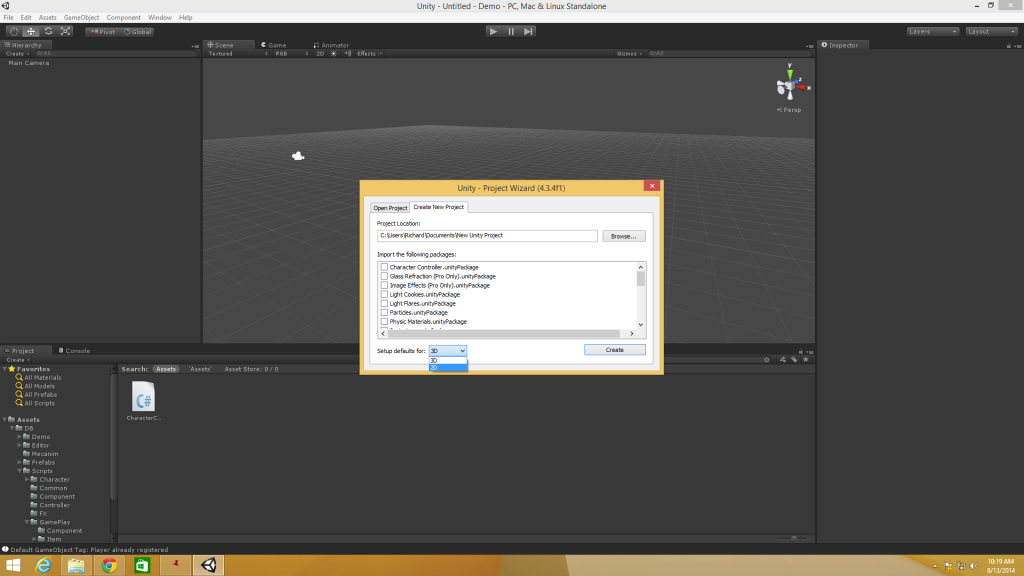
Next we will be changing the project type to 2D instead of 3D.


Selecting 2D Project Type

When selecting 2D as you create a new project it will have the editor settings and scene view configured for 2D. Select 2D at the bottom left of the new project dialogue box.


Unity 2D New Project 2D Select


Hit the “Create” button to the right and the creation process is done!


New Unity 2D Project

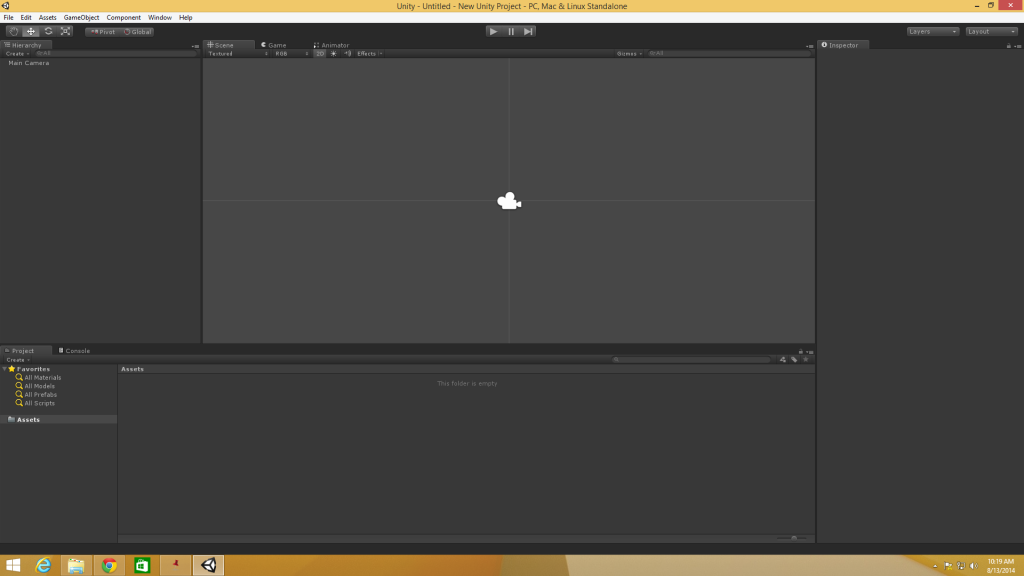
When it is created you will see Unity look like this:


Unity 2D Project Created


The editor settings will treat the project as 2D while the scene view will display the view in 2D instead of 3D. This means the default camera for the scene will be set to Orthographic and when importing images they will be considered Sprites instead of Textures.


Well there you have it!  It’s 3 simple steps to get your new Unity 2D Project up and running.


Marketing Your Indie Game

Video Game Marketing

Game Marketing Methods

There once was a time when marketing your indie game was unthought of.  Development of the game was the only thing on the mind and everything else just fell into place. Today, it’s a completely different game and the importance of marketing is here.

There are many ways to market and spread the word of your game and they are in this article!


When to Begin Marketing Your Indie Game

There is no specific time frame within the development life cycle on when to begin marketing your game.  This all comes down to having content to show off to begin with.  When it comes to content, anything visual will do.  Once there is that first screenshot, first level, or first character for the game that’s when you begin your marketing.  No need to wait until the very end get started with the methods below!

How to Market Your Indie Game

There are no shortcuts when it comes to marketing an indie video game.  It takes time, patience and persistence to reap any of the benefits.  The best part about it is, once all of the marketing outlets are set up maintaining it will be easy!

Here are a list of essentials for a marketing campaign:

  • Website
  • Social Media
  • Blogging
  • Trailer

The list is small, but when used correctly they all can be very powerful tools for marketing your game.

Website

A website is a great way to give back story on how you started developing games, the team, and an overall description of what the indie company is all about.  This is the best place to showcase games with call to actions.  The website won’t get much traffic until other methods in this article are used.  No need to rush!

If you don’t have hosting I would recommend using one like Dreamhost because they are inexpensive and reliable.

Blogging

Everybody loves to blog, right?  WRONG!  Well, not everybody at least.  Blogging is useful because it gives you the ability to directly  communicate with your audience.  Blogs are great for announcements, expressing how overcoming game development hurdles was fun, difficult or easy and upcoming events.

Social Media

Social media is very important for marketing your game.  Not only can you directly communicate one-on-one or one-to-many with your audience, but it has the capability of making things go viral.  One example is, trends on twitter.  Everything that is trending is displayed in that section of twitter and everyone can see it!  Okay, it might be far fetched thinking an indie game can trend, but if you use hashtags properly and people talk about your game a lot it can draw a lot of attention.

Trailers

Trailers are a great way of showing off your game don’t skip out on this!  Not only will the trailer make your website more appealing if used properly your video can be found through youtube which will draw more attention.

Conclusion

There are other ways of advertising your game that have not been mentioned. What’s most important are the basic elements listed above because it allows to communicate with your audience directly, gives you a presence and an outlet for all of your content.

Using Unity 4 For Making a Video Game

Unity 4

Getting Started

Unity 4 is an easy to use cross-platform engine that’s powerful enough to support 2D and 3D games. Learn how Unity 4 can help you with making a video game in this article!

What is Unity 4

Unity 4 is an easy to use yet a very powerful 3D game engine.  It’s graphical interface makes it easily usable for the beginner, but it also contains the power housing for the expert video game developer. Unity 4 is for anybody who is interested in making  a video game for desktop, console, mobile, and the web.

Cost

Unity 4 is free forever!  To an extent of course.  There is a Pro version of Unity that comes with extra features that aren’t needed for most video games.  However, if you find out that you need to purchase a license it starts at $1,500.  For the Indie developers that prefer a monthly subscription, it starts at $75/month and all the same features are included as if you purchased the license out right.

Installation

Installing Unity 4 is straight forward.  If you haven’t downloaded a copy of it yet make sure you do so first here.  The only thing that is needed for the free version of Unity 4 is to register an account which can be done when asked for your username and password after the installation.


Making a Video Game


Starting a New Project

When you start Unity 4 for the first time a welcome screen will popup.


Getting Started Making a Video Game


An example project loads up for the first time as well.  It’s a basic project that allows anyone to see the capabilities of Unity 4 right after installation. To give it a test run just hit the Play button at the top of the screen. Looks like the image below.

Unity 4 Play Button

Conclusion

Unity 4 is an all around great engine for making video games.  It’s something that can be used for basic to advanced projects giving it the capability of lasting a lifetime.   Get it now and start making that next hit video game!


Unity 4 DevelopmentUnity 4.x Game Development By Example
Learn Unity 4 with this book that teaches you in both Javascript and C#. Follow along and develop 5 unique games all the way to completion.  Gain an understanding of the basic flow of Unity 4 and start learning today!
Buy From Amazon

Game History

 Game History

Playing games has been all throughout history.  I’m not talking about video games though.  I’m talking about way before video games existed, and even the television! Video Game History is recent compared to what I’m going to write about.

One of the earliest known games is from ancient Egypt.  It was called Senet, which was dated supposedly back around 3500BC.  That’s really crazy thinking about ancient Egyptians were playing board games like we do today.

Another board game the ancient Egyptians played was called Ur.  Ancient games have stood against time and are still considered relevant today!  They are games that were played amongst each other where they had rules and outcomes that were agreed upon before playing.  The outcome is usually where one player is a winner and the other is a loser.

The players also defined certain rules that must be followed.  Rules are also called game mechanics.  Some common examples of game mechanics are, Luck, Diplomacy, Territory control, Resource Management, and Strategy.  Luck being a random chance or event from happening.  Diplomacy is how the players interact with each other.  Strategy is based off of player’s ability to plan their moves.  Resource management is about managing assets, and Territory control is about developing, controlling the game space.

A crucial aspect of any game is that it needs to define a goal or an outcome and once the outcome is reached it is usually considered a win.  An example of a goal can be to eliminate the player completely from the game, obtaining a goal or achieving some type of target.

By achieving the goal this can be enough of a reward for the winner of the game. For example, beating the opposing player in checkers brings the satisfaction of conquering the other player.  I’d say it’s a much safer then playing a game of Russian roulette.


How to Make Video Games – Designing Games

 Designing Games

Designing video games is a task that should not be forgotten.  This is something that needs to be done way before code is started.  It’s like the blue print of your game and if you don’t have that then how will you know what to do?

What should get done first when designing games? A few things actually.  The design document should contain the summary, target audience, platform, genre, core gameplay, visual style and storyline.


Game Design Summary

The summary should contain only a few sentences to describe your game. It’s like an elevator pitch or another example is the few lines of text on the back of the boxes for games that grab your attention. Think this through and make sure you’ve chosen the right words!


Target Audience

Your target audience is important for designing games. The target audience should be the people who you think will be playing your game. Some examples would be, casual gamers, teens, adults, children. There are quite a bit to choose from, but make sure it’s the right choice.

Platform, Genre, and Game Play

It’s easier to just put these three together in the post, however they should be kept separate and thought of as different when writing your document. Platform can be anything from PC, handheld, mobile, or console. Some of these platforms are free to develop for while others are not. An example is for mobile. A fee is required just to add your game to the App Store or Android Play.

Genre is more about the type of game you’re creating. It can be a First Person Shooter, Role Playing Game, or Real Time Strategy. There are a lot more genres out there, and you can actually mix and match them to come up with something unique.

When talking about Game Play you talk more about Goals and rewards when designing games. What goals does the player have to do in order to win and what are their rewards.

Visual Style & Storyline

The visual style of the game is important. It can be, and it’s not limited to, 2D pixel art or it can be a massive 3D world with high texture quality.

Storyline is important to add to the document as long as there is one. It can be something simple, none at all or something that’s very elaborate.

That’s it for now on designing games. I’ll be to include a full document example in the future!

This is part of series on How to Make Video Games

How to Make Video Games – Video Game Making Software

Video Game Making Software

Video Game Making Software

There’s a ton of software out there that can help you make video games. When I say software I mean software development kits or an actual game engine. Each software has features that you may or may not need so make sure to do your research before investing time into one.  The three that I will be going into are my favorite from personal experience.  They are Unity 3D, Corona SDK and Cocos2D.

Unity 3D engine is a great one to learn if you’re looking to create 2D/3D video games on various platforms. It also comes with its own WYSIWYG editor so you don’t have to code everything. Unity 3D is great for beginner and experts since it uses multiple programming languages such as Javascript and C#, however it has a moderate learning curve. There is a free version available with some features missing.

Corona SDK is awesome if you’re just starting out learning how to make video games.  It allows for rapid prototyping and actually rapid development too. Great for beginners. I’ve used this one for the majority of my games, and the development speed is great! It allows for multi platform development, but for the majority of the features you would need to pay for them.

I would suggest using Corona SDK if you have the money and are planning to create simple video games.

Cocos2D is another SDK if you’re looking to develop for the iOS only. It allows you to code natively for the iPhone which means you can integrate all the latest features into your game without having to wait for an update from a 3rd party developer such as the two engine’s above. Cocos2D has a WIYWYG interface, however I don’t have much experience with it so I can’t comment on that. Overall it’s a great SDK if you’re looking to already work with the Objective-C programming language, and I’ve created more advanced game’s with this SDK then I have with Corona SDK.

There are a ton more SDKs and Engines out there then what I have previously mentioned, however these are the ones I have most experience with and can give some solid advice on how to make video games.

This is part of series on How to Make Video Games